To install Synology DiskStation Manager (DSM) on non-Synology hardware (also known as Xpenology), there are two common methods: (1) install DSM directly on bare-metal hardware, or (2) install a hypervisor at first, then install DSM in a guest machine. Both methods rely on third-party boot loaders (e.g. ARPL and RR). In this article, I will guide you to install Synology Virtual DSM, the official virtualization solution of Synology, on Proxmox VE.
Comparing with third-party boot loaders, Virtual DSM provides some advantages:
- With VirGL paravirtualized GPU, it’s easy to enable facial & subject recognization in Synology Photos. No need to configure GPU pass-through anymore!
- Only official binaries from Synology have been used.
- Drivers of QEMU/KVM virtio devices are built-in.
However, there are disadvantages, too:
- No support for NVMe controllers. You couldn’t pass-through NVMe SSDs, instead, you need to connect them as virtual disk devices.
- No support for SMART. You need to configure SMART monitoring on the Proxmox VE host.
- Disks initialized by Virtual DSM have different partition layout comparing with official Synology and Xpenology hardware. For each disk, only 1 partition will be created and formatted as a Btrfs file system.
- No supprt for Virtual Machine Manager.
- Surveillance Station doesn’t contain any free licenses.
Steps provided in this article come from vdsm/virtual-dsm, which is a Docker container allowing installation of Virtual DSM. For such a container, /dev/kvm on the host must be mounted to the container at first, then KVM will be started. Since Proxmox VE doesn’t support Docker containers yet, therefore, I wrote this article to guide you to install Virtual DSM directly, without needing of Docker.
Prerequisites
Your host machine should have installed Proxmox VE 8 (or higher versions). If not, you should grab an installation image from here.
Create the Guest Machine
You need to create a guest machine for Virtual DSM in Proxmox VE. During the creation process, you should:
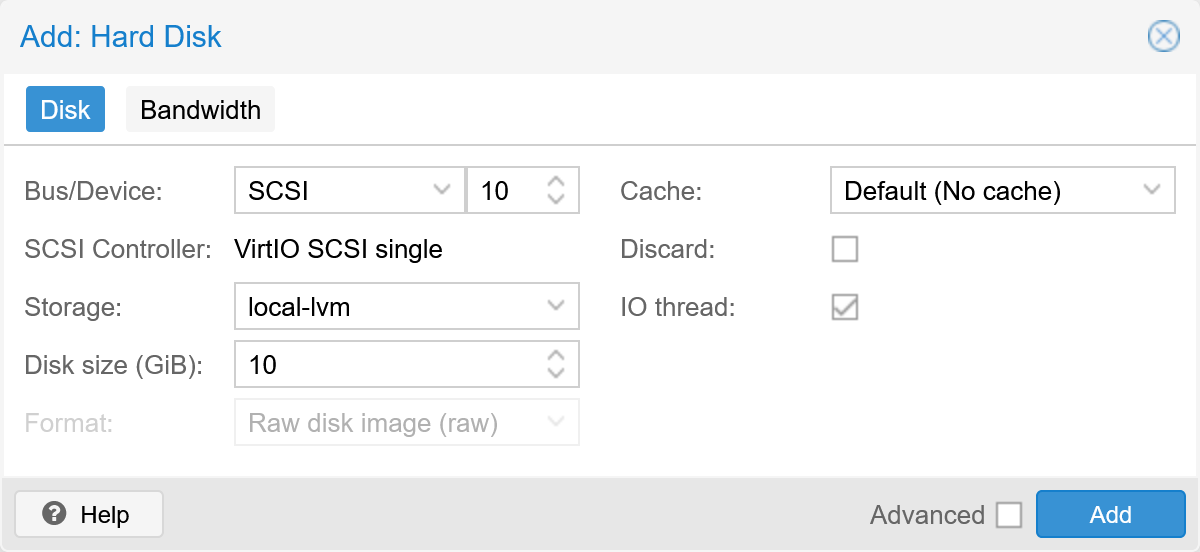
- Choose VirtIO SCSI single as the SCSI controller
- Don’t enable QEMU guest agent
- Create a 128 MiB (0.125 GiB) sized boot disk at scsi9
- Select the bridge to your LAN for NIC
After creation, create a 10 GiB sized system disk at scsi10. Data disks should be added at scsi11, scsi12, etc.


Obtaining the Patch Extraction Utility
tar is incapable for extraction of newer DSM patch files. Therefore, you
need to get the extraction utility syno_
# wget https://global.synologydownload.com/download/DSM/release/7.0.1/42218/DSM_VirtualDSM_42218.pat
--2025-11-26 04:07:29--  https://global.synologydownload.com/download/DSM/release/7.0.1/42218/DSM_VirtualDSM_42218.pat
Resolving global.synologydownload.com (global.synologydownload.com)... 104.20.27.186, 172.66.147.208, 2606:4700:10::ac42:93d0, ...
Connecting to global.synologydownload.com (global.synologydownload.com)|104.20.27.186|:443... connected.
HTTP request sent, awaiting response... 200 OK
Length: 379637760 (362M) [application/octet-stream]
Saving to: ‘DSM_VirtualDSM_42218.pat’

DSM_VirtualDSM_42218.pat      100%[=================================================>] 362.05M  5.22MB/s    in 81s

2025-11-26 04:08:51 (4.46 MB/s) - ‘DSM_VirtualDSM_42218.pat’ saved [379637760/379637760]
Extract the rd.gz from the patch file with the following command:
# tar -xvf DSM_VirtualDSM_42218.pat rd.gz
rd.gz
Extract the rd.gz with the following command:
# xz -dc < rd.gz > rd.cpio
xz: (stdin): Compressed data is corrupt
# mkdir rd
# cd rd
# cpio -idm < ../rd.cpio
36797 blocks
# cd ..
Prepare files for syno_
# mkdir extract
# cp rd/usr/lib/libcurl.so.4 \
> rd/usr/lib/libmbedcrypto.so.5 \
> rd/usr/lib/libmbedtls.so.13 \
> rd/usr/lib/libmbedx509.so.1 \
> rd/usr/lib/libmsgpackc.so.2 \
> rd/usr/lib/libsodium.so \
> rd/usr/lib/libsynocodesign-ng-virtual-junior-wins.so.7 \
> extract
# cp rd/usr/syno/bin/scemd extract/syno_extract_system_patch
# chmod +x extract/syno_extract_system_patch
Download DSM and Prepare the Root File System
Download the patch file of DSM 7.2.2-72806 with the following command:
# wget https://global.synologydownload.com/download/DSM/release/7.2.2/72806/DSM_VirtualDSM_72806.pat
--2025-11-26 04:10:11--  https://global.synologydownload.com/download/DSM/release/7.2.2/72806/DSM_VirtualDSM_72806.pat
Resolving global.synologydownload.com (global.synologydownload.com)... 104.20.27.186, 172.66.147.208, 2606:4700:10::ac42:93d0, ...
Connecting to global.synologydownload.com (global.synologydownload.com)|104.20.27.186|:443... connected.
HTTP request sent, awaiting response... 200 OK
Length: 361010261 (344M) [application/octet-stream]
Saving to: ‘DSM_VirtualDSM_72806.pat’

DSM_VirtualDSM_72806.pat      100%[=================================================>] 344.29M  1.84MB/s    in 65s

2025-11-26 04:11:16 (5.28 MB/s) - ‘DSM_VirtualDSM_72806.pat’ saved [361010261/361010261]
Extract contents of the patch file to patch directory with the following commands:
# mkdir patch
# LD_LIBRARY_PATH=extract extract/syno_extract_system_patch DSM_VirtualDSM_72806.pat patch
Extract the boot loader with the following command:
# unzip patch/synology_kvmx64_virtualdsm_72806_8A784779__.bin.zip
NOTE: If unzip is not installed, execute apt install unzip, then
try again.
Prepare the root file system with the following commands:
# mkdir rootfs
# mv patch/hda1.tgz patch/hda1.txz
# mv patch/packages rootfs/.SynoUpgradePackages
# rm rootfs/.SynoUpgradePackages/ActiveInsight-x86_64-2.2.3-23123.spk
# tar -xJpf patch/synohdpack_img.txz -C rootfs
# mkdir -p rootfs/usr/syno/synoman/indexdb
# tar -xJpf patch/indexdb.txz -C rootfs/usr/syno/synoman/indexdb
# tar -xJpf patch/hda1.txz --skip-old-files -C rootfs
Create Disk Paritions and Install DSM
Remember your virtual machine ID, which is usually a 3-digit number (e.g. 100). In later command examples, I’ll mark it as <VMID>. When reaching such marks, you should replace them with your ID. Also, ↵ marks that you should press Enter, accepting the default option or value.
Create disk partitions with the following commands:
# fdisk /dev/pve/vm-<VMID>-disk-1

Welcome to fdisk (util-linux 2.38.1).
Changes will remain in memory only, until you decide to write them.
Be careful before using the write command.

Device does not contain a recognized partition table.
Created a new DOS (MBR) disklabel with disk identifier 0x3ab8643b.

Command (m for help): x

Expert command (m for help): i

Enter the new disk identifier: 0x6f9ee2e9

Disk identifier changed from 0x3ab8643b to 0x6f9ee2e9.

Expert command (m for help): r

Command (m for help): n
Partition type
   p   primary (0 primary, 0 extended, 4 free)
   e   extended (container for logical partitions)
Select (default p): ↵

Using default response p.
Partition number (1-4, default 1): ↵
First sector (2048-20971519, default 2048): ↵
Last sector, +/-sectors or +/-size{K,M,G,T,P} (2048-20971519, default 20971519): -2G

Created a new partition 1 of type 'Linux' and of size 8 GiB.

Command (m for help): n
Partition type
   p   primary (1 primary, 0 extended, 3 free)
   e   extended (container for logical partitions)
Select (default p): ↵

Using default response p.
Partition number (2-4, default 2): ↵
First sector (16777216-20971519, default 16777216): ↵
Last sector, +/-sectors or +/-size{K,M,G,T,P} (16777216-20971519, default 20971519): ↵

Created a new partition 2 of type 'Linux' and of size 2 GiB.

Command (m for help): t
Partition number (1,2, default 2): ↵
Hex code or alias (type L to list all): 82

Changed type of partition 'Linux' to 'Linux swap / Solaris'.

Command (m for help): w
The partition table has been altered.
Calling ioctl() to re-read partition table.
Re-reading the partition table failed.: Invalid argument

The kernel still uses the old table. The new table will be used at the next reboot or after you run partprobe(8) or partx(8).
Create the file system with the following commands:
# losetup -P /dev/loop0 /dev/pve/vm-<VMID>-disk-1
# mke2fs -t ext4 -b 4096 -d rootfs -L 1.44.1-42218 /dev/loop0p1
mke2fs 1.47.0 (5-Feb-2023)
Creating filesystem with 2096896 4k blocks and 524288 inodes
Filesystem UUID: 48a083ee-8164-4138-8b3c-a6281077d7a0
Superblock backups stored on blocks:
        32768, 98304, 163840, 229376, 294912, 819200, 884736, 1605632

Allocating group tables: done
Writing inode tables: done
Creating journal (16384 blocks): done
Copying files into the device: done
Writing superblocks and filesystem accounting information: done

# losetup -d /dev/loop0
Write the boot loader with the following command:
# dd if=synology_kvmx64_virtualdsm_72806_8A784779__.bin of=/dev/pve/vm-<VMID>-disk-0 bs=1M
Configure qemu-host and Add Graceful Shutdown Support
Virtual DSM exchanges information (e.g. the serial number, the CPU model) with a proprietary protocol over standard QGA ports. However, the built-in QEMU guest agent of Proxmox VE couldn’t support them. Therefore, we need to install a third-party program, qemu-host, to specify hardware information manually.
There are many ways to run qemu-host, in this article I choosed systemd for this purpose. Also, since Virtual DSM doesn’t respect ACPI shutdown commands, a hookscript will be used for sending HTTP requests to qemu-host, letting it to correctly shut down the guest machine.
Download qemu-host
Download qemu-host with the following command:
# wget -O /usr/local/bin/qemu-host https://github.com/qemus/qemu-host/releases/download/v2.05/qemu-host.bin
--2024-11-29 23:45:58--  https://github.com/qemus/qemu-host/releases/download/v2.05/qemu-host.bin
Resolving github.com (github.com)... 20.27.177.113
Connecting to github.com (github.com)|20.27.177.113|:443... connected.
HTTP request sent, awaiting response... 302 Found
Location: https://objects.githubusercontent.com/github-production-release-asset-2e65be/632726151/48da73b8-9845-4d85-9301-3d71346f3ff2?X-Amz-Algorithm=AWS4-HMAC-SHA256&X-Amz-Credential=releaseassetproduction%2F20241129%2Fus-east-1%2Fs3%2Faws4_request&X-Amz-Date=20241129T154600Z&X-Amz-Expires=300&X-Amz-Signature=a6153112e3262b37797983b29eaf6cd0525b4eb027da83db29cca4522f6f9f91&X-Amz-SignedHeaders=host&response-content-disposition=attachment%3B%20filename%3Dqemu-host.bin&response-content-type=application%2Foctet-stream [following]
--2024-11-29 23:46:00--  https://objects.githubusercontent.com/github-production-release-asset-2e65be/632726151/48da73b8-9845-4d85-9301-3d71346f3ff2?X-Amz-Algorithm=AWS4-HMAC-SHA256&X-Amz-Credential=releaseassetproduction%2F20241129%2Fus-east-1%2Fs3%2Faws4_request&X-Amz-Date=20241129T154600Z&X-Amz-Expires=300&X-Amz-Signature=a6153112e3262b37797983b29eaf6cd0525b4eb027da83db29cca4522f6f9f91&X-Amz-SignedHeaders=host&response-content-disposition=attachment%3B%20filename%3Dqemu-host.bin&response-content-type=application%2Foctet-stream
Resolving objects.githubusercontent.com (objects.githubusercontent.com)... 185.199.111.133, 185.199.108.133, 185.199.109.133, ...
Connecting to objects.githubusercontent.com (objects.githubusercontent.com)|185.199.111.133|:443... connected.
HTTP request sent, awaiting response... 200 OK
Length: 7247431 (6.9M) [application/octet-stream]
Saving to: ‘/usr/local/bin/qemu-host’

/usr/local/bin/qemu-host     100%[===========================================>]   6.91M  1.62MB/s    in 4.7s

2024-11-29 23:46:08 (1.47 MB/s) - ‘/usr/local/bin/qemu-host’ saved [7247431/7247431]
Determine your CPU model with the following command:
# lscpu | grep -m 1 'Model name' | cut -f 2 -d ":" | awk '{$1=$1}1' | sed 's# @.*##g' | sed s/"(R)"//g | sed 's/[^[:alnum:] ]\+/ /g' | sed 's/  */ /g'
<CPU>
Create and Enable qemu-host systemd Service
Create file /etc/systemd/system/qemu-host.service, and fill with the following content:
[Unit]
Description=QEMU Host for Virtual DSM
Before=pve-guests.service

[Service]
ExecStart=/usr/local/bin/qemu-host -cpu <N-CORES> -cpu_arch '<CPU>,,'

[Install]
WantedBy=multi-user.target
Replace <N-CORES> with the number of CPU cores allocated to the virtual machine, and replace <CPU> with the CPU model retrieved from the previous step.
To sign in with your Synology account in Virtual DSM or activate Surveillance Station licenses, the ExecStart line should be replaced with the following content:
ExecStart=/usr/local/bin/qemu-host -cpu <N-CORES> -cpu_arch '<CPU>,,' -hostsn <HOST-SN> -guestsn <GUEST-SN>
Replace <HOST-SN> with the serial number of a official Synology device, and replace <GUEST-SN> with a valid Virtual DSM serial number. To obtain one, you should create a Virtual DSM on official hardware, then get its serial number.
To enable Advanced Media Extensions on DSM 7.2 (or higher versions), the ExecStart line should be replace with the following content:
ExecStart=/usr/local/bin/qemu-host -cpu <N-CORES> -cpu_arch '<CPU>,,' -mac <MAC> -model <MODEL> -hostsn <HOST-SN> -guestsn <GUEST-SN>
Replace <MAC> with the MAC address of a official Synology device, and replace <MODEL> with the model name of the device.
Then, reload and enable the service with the following commands:
# systemctl daemon-reload
# systemctl enable --now qemu-host
Configure the hookscript
Create file /var/lib/vz/snippets/hookscript-vdsm.sh, and fill with the following content:
#!/bin/sh
if [ "$2" = pre-stop ]; then
        echo 'Sending graceful shutdown command to qemu-host'
        curl -sSm 52 'http://127.0.0.1:2210/read?command=6&timeout=50'
        echo
else
        echo "Unknown phase $2, ignoring"
fi
Specify the above file as the hookscript with the following commands:
# chmod +x /var/lib/vz/snippets/hookscript-vdsm.sh
# qm set <VMID> -hookscript local:snippets/hookscript-vdsm.sh
update VM <VMID>: -hookscript local:snippets/hookscript-vdsm.sh
Configure the QGA Device
Edit the VM configuration file /etc/pve/qemu-server/<VMID>.conf, and add the following content into the file:
args: -chardev 'socket,host=127.0.0.1,port=12345,server=off,reconnect=10,id=qga0' -device 'virtio-serial,id=qga0,bus=pci.0,addr=0x8' -device 'virtserialport,chardev=qga0,name=vchannel'
Turn on Virtual DSM
Congratulations! Your Virtual DSM is ready now. Please turn on your virtual machine, then connect to DSM by enter its IP address in the address bar of the Web browser. If you are unable to find the IP address, you can use Synology Web Assistant.
You could clean up files produced during the installation with the following command:
# rm -rf DSM_VirtualDSM_*.pat extract patch rd*
If you want to install more Virtual DSM machines, it’s advise to keep
the boot loader file (synology_
# rm -rf synology_kvmx64_virtualdsm_*.bin rootfs